Hotline đặt Bánh sinh nhật
Hà Nội: 03.666.22.666Hướng dẫn cách nặn fondant chim cánh cụt - penguin
Hunnie Cake (Lambanhngon.com) - Dạy làm bánh - Đặt bánh cưới, sinh nhật


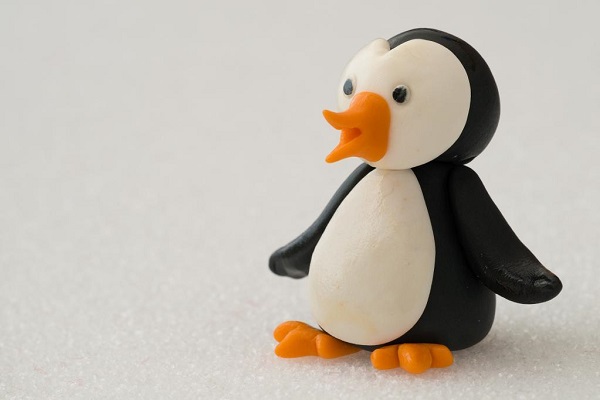
 Roll out your white fondant thinly and cut out ovals and then attach them to the penguin body using some water

 I wanted to use white hearts for the face, but didn’t have a heart cutter large enough, so I used my flower cutter and cut the heart that way (so resourceful of me!)

 Add a toothpick/dry pasta into the body, dab some water on top and attach the head.

 Make a hole with your toothpick at the bottom of the penguin so that you can easily attach the penguin to your cake when it hardens (I always prefer to be able to ‘spike’ my fondant toppers into the cake)
Cut out a black oval for the arms and using the same oval cutter, cut both sides of the oval.


 Attach the arms to the penguin and then rest the arms against something (I’ve used a combination of cutters, the side of my tray, the snowman and a small rolling pin) so that the arms will dry curved.


 Leave the penguins to dry for at least 24 hours.
To make the beaks, roll out small orange tear shaped balls and then using sharp scissors, cut the pointy end.

 Draw on the eyes using a black edible marker and then attach the beak using some water or edible glue.
 I then dressed up the penguins with scarfs (thin strips of fondant), ear muffs (thin strip of fondant over the head and two small flattened balls of fondant) and flowers (I used a mini blossom cutter).
 The snowman was simply two balls of fondant (I used a toothpick the same way as for the penguins), a red scarf (thin strip of fondant), a tear drop shaped nose, drawn on eyes and buttons and the stick arm is actually two toothpicks which I coloured black (using my edible marker) and superglued the two together to get the ‘twig’ effect
 ![]()


Các tin cùng chuyên mục
Cách làm sushi đặt lên bánh - 07/07/2014 17:43Hướng dẫn cách làm chong chóng đặt lên cupcake - 07/07/2014 17:41
Cách làm hoa hồng david austin - JessicaVu - 07/07/2014 17:37
Cách phủ bánh fondant lâu đài - 07/07/2014 17:34
Các bước làm bánh phủ fondant hộp quà tặng giầy cao gót - 07/07/2014 17:33
Cách làm hoa Peony bằng gumpaste - 02/07/2014 09:33
Những cách trang trí bánh đường dẻo với tông Pastel hoa đẹp - 27/06/2014 08:00
Hướng dẫn trang trí bánh fondant (đường dẻo) chủ để đại dương - 27/06/2014 07:55
Cách trang trí bánh kem phô mai (Cheese cake) ngon ứa nước miếng - 24/06/2014 10:16
Hướng dẫn làm Ông già Noel bằng dâu tây xinh yêu - 03/12/2013 21:40
Hướng dẫn cách làm chocolate trang trí bánh - 03/12/2013 21:38
Những loại đui thông dụng và cách trang trí bánh khi sử dụng đui - 06/08/2013 08:07
Hướng dẫn cách làm hoa hồng bằng fondant hay gumspate - 27/07/2013 20:29
Hướng dẫn làm hoa hồng fondant và trang trí cupcake - 27/07/2013 20:23
Hướng dẫn cách làm bánh kẻ caro hay cách tạo hình cốt gato bàn cờ hay còn gọi là Checkerboard Cake - 09/07/2013 21:32
Bánh Sinh Nhật Bé Trai 1 Tuổi Con Mèo – Món Quà Ngọt Ngào và Đáng Yêu từ Hunnie CakeGiá: 850.000 VNĐ
Bánh Sinh Nhật Lịch Tháng: Mừng Tuổi Mới của Bé trai và Bé Gái - Kỷ Niệm Tập Thể Ngọt NgàoGiá: 350.000 VNĐ
Bánh Cupcake Ngựa Thiên Thần và Cầu Vồng: Kỷ Niệm Tuổi Thơ Đáng Yêu Tặng Bé Gái 11520Giá: 315.000 VNĐ
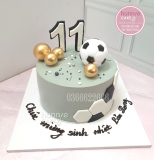
Bánh Sinh Nhật Số 11: Niềm Đam Mê Bóng Đá của Bé Trai 11519Giá: 350.000 VNĐ
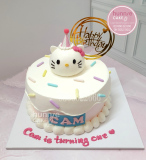
Bánh Sinh Nhật Hello Kitty Dành Cho Bé Gái: Mừng Năm Đầu Đáng Yêu của Cam 11518Giá: 300.000 VNĐ
Dạy làm bánh - Nhận đặt Bánh cưới, Bánh sinh nhật, Bánh Handmade 100% theo yêu cầu - Cung cấp nguyên liệu, dụng cụ làm bánh
Cơ sở 1: Số 65 Ngõ 111 Cù Chính Lan - Thanh Xuân - Hà Nội (Đến số 311 Trường Chinh - Ngã tư sở đi vào) (Xem bản đồ)
Cơ sở 2: Số 10A Tràng An - phường Tân Thành - Thành phố Ninh Bình. ( Đối diện hồ Kỳ Lân) ( Xem bản đồ)
Điện thoại : 03.666.22.666 (Viber/Zalo) - 08.5622.5622 - 0983.002.989 (WhatsApp)
Số TK: 10524948099011 - Chủ TK: Mai Thu Trang - Ngân Hàng: Techcombank - Hà Nội.
Số TK: 0021001040845 - Chủ TK: Mai Thu Trang - Ngân Hàng: Vietcombank - Hà Nội .
Email: hunniecakehn@gmail.com
--------------------------
|
Cửa hàng bánh Hunnie Cake |